Showing posts with label SMART. Show all posts

Thursday, February 7, 2013

Balloon Pop Tool: SMART

In an effort to continually keep students engaged in our lessons, it helps to add variety to the interactive parts of our Smart lessons. Once you feel confident in creating a notebook in Smart, varying the ways that students interact with the content makes each lesson new and exciting. The Smart Exchange website is a great place to find ideas, such as the Balloon Pop Tool for revealing answers. 

A complete tutorial is available here.

Start by opening Smart Notebook and clicking on the Gallery tab. Search "Balloon Pop" and it should come up. The tutorial should explain everything else, so I won't recreate it here. 


Tips for using this tool:

1. Notebook works in layers, as in each item you put on the page will be layered over the next. So if you put the balloon on the page before you put the answer to be covered up, the answer will not be hidden by the balloon because it is layered over the balloon. This is fixed by right-clicking the balloon, select "order" and then "bring to front". Now the balloon is the top layer. 

2. The tutorial asks that the "Lesson Activity Toolkit 2.0" be downloaded. This should be downloaded already if your software is up to date. For more info, on the tools available in this toolkit check out this Notebook. 

Now you have one more trick in your book for making lessons interactive!


Thursday, January 3, 2013

Activity Builder: SMART Notebook 11

SMART Notebook 11, which has been fully updated with new features has made the software a lot easier to use. For starters, the menu at the top allows for easier adjustments when creating shapes and fonts. The process is much faster and easier to adjust. But another great new feature is the Activity Builder.

The Activity Builder allows the user to put objects on the page and choose one object to be the activity object. Let's say the activity object is the number 4. The other objects on the page either go with the number 4 or they don't.

Once I have the objects on the page, I click on the puzzle icon on the side of my screen. This is the Activity Builder.


To choose the 4 as the activity object, I select the number 4 and reselect the puzzle icon.

Then I click and drag each of the other objects to the "accept" or "reject" boxes in the Activity Builder  menu.


For efficiency, I dragged the three objects to be rejected to the reject box and then clicked "Add All Remaining" in the accept box. Nice to have.

Once all objects that are part of the activity have been added to the appropriate boxes, you can choose to adjust settings or click "Done". In the "Settings" tab on the Activity Builder menu you can choose the animation of the objects, such as fading out or bouncing away.


Now students can come to the board and drag the objects that make the number 4. If they are right, my objects will fade into the 4. If they are wrong, the object bounces back out.


Promethean has a way to make an activity just like this (See "Creating Containers"), but for once, SMART made it a lot easier and faster. Use this activity whole group, small group, or for centers. It allows interaction and instant feedback. Awesome!

Thursday, September 20, 2012

SMART Exchange Resources

The SMART website is a good resource for training and tips to enhance your lessons. Whether a beginner or more advanced, you'll probably still find something new. A good place to start is http://www.smarttech.com. (This is different from the SMART Exchange where you can download lessons.) On the top navigation, go to Resources and click on Training and Professional Development.

Scroll down the page and you have a few options. I suggest checking out the Free Resources or the Training for Education sections.

The Free Resources section has short tutorials or PDFs with step by step directions.  (Find the "more" button to expand each section to browse said tutorials.)


Many of these are much like the other tutorials I put on this blog. Short, step-by-step, with pictures to help you learn to do one thing at a time. As someone who has not actually taught with a SMART board in my classroom (I had Promethean), everything I've learned about SMART has been self taught or learned by searching resources like this. I was very excited to come across these guides. I learned some new, very fun things to put in my notebooks.

Like the magnifying glass:


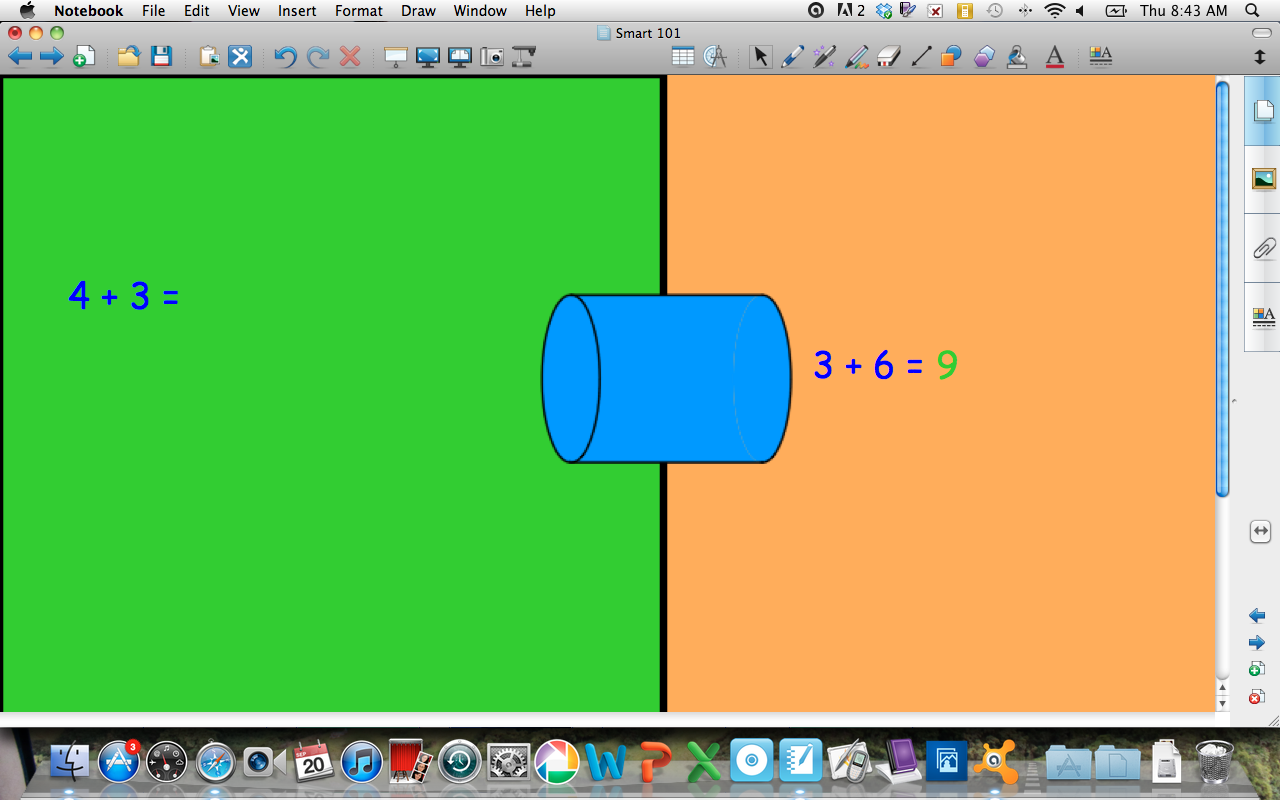
And the Magic Tunnel:


I recommend revisiting this site often to find new ways to add interaction to your lessons.

Sunday, July 22, 2012

Morning Routines

As we approach the beginning of the school year we know we will have students who are new to interactive whiteboards, or at least need a refresher course. A great way to get students used to using the board is by making it part of your morning routine. Plus, you're already starting the day out using technology!

Check out Promethean Planet or SMART Exchange and search for "lunch count" or "attendance". You'll find plenty of templates, even by holidays and seasons. You can download them and change them as you'd like. An added organizational bonus: Use "save as" to save each lunch count/attendance to a special folder and refer back to it if you can't remember when a student was absent or how many students ordered pizza.


You can also change these templates around to use them as a poll for anything from gauging student interest to asking students to predict the weather or what will happen next in the book you are reading. You could have students use their own names or simply use shapes or icons to make the voting anonymous. There are also a few morning calendar routines on the sites, but you may want to use them as a jumping off point to creating your own. 

Thursday, March 1, 2012

SMART: Magic Pen

SMART Notebook 10 has a feature called Magic Pen. I recently discovered some new ways to use it.

You can find Magic Pen next to your other pen icons:


The first time I clicked on the icon all I discovered was a pen tool that works like disappearing ink. You write, and within a few seconds it begins to fade away and disappear. That could be kind of cool if you are wanting to highlight something only for a moment.

You see here how what I wrote first is starting the fade away:


There are two ways to use Magic Pen that I didn't know before.

To create a spotlight:

1. Click on Magic Pen and draw a circle.


Once your circle is drawn and you life the pen off the board, a spotlight will appear.


You can resize the circle and move the spotlight around to reveal smaller portions of your picture or text at a time.


To create a magnifier:

1. Click on Magic Pen and draw a rectangle.


2. Once your rectangle is drawn and you lift the pen off the board, a magnifier will appear.


You can move the magnifier around on the screen and resize it to magnify different parts of your picture or text.

These are just two new things I learned that I thought I'd share. It definitely adds another element to your lessons and would be easy for a student to do as well.

Thursday, February 2, 2012

SMART: Standards Correlated Lessons

Did you know there is an easy way to search for lessons that go with specific standards? When you go to the SMART Exchange website, click on the tab on the top navigation bar labeled "Standards Correlated Lessons". Using the drop down menus, input your state, standards, and subject. Then hit "View"


The standards will appear and so will lessons to go with each.


Totally simple way to get lessons that you know are right on the money, instead of searching through pages and pages of notebooks.

Thursday, January 26, 2012

SMART: External Links


At some point you may be doing a lesson that would benefit from showing several websites or documents. You can create links to external elements in your flipchart for easy one-click access to these items. Here's how it's done:

Website:
1. Choose your website you would like to link to. 

2. You can put the link directly in the page or add the link to an image. 

To link directly to the page go to Insert-->Link (You may notice you can also add pictures, flash files, and sounds using the same Insert menu.)


To link to a picture, add the picture. Click on the picture arrow on the top right. Go to Insert Link.


3. Type or Copy/Paste the URL into the box that comes up.


You can click on the link in the page to get to the website. 
You can also click on the picture to get to the website. 

File:
Follow the same steps as above. Except, instead of a website, click the down arrow and choose File from this computer. Find your file and Insert.


Video:
You can also insert videos into your Notebook. Just go to Insert--->Video File


The only thing is that you can only insert an .flv file (Adobe Flash Player).

If you are downloading videos from Discovery Education, just make sure to change the download file type to Flash. This is located under the video on your screen when logged in to Discovery Education.


If you don't have a .flv file, you can download a file converter, but you are not able to do that from the network or on your school laptop.

The media converter that SMART recommends is mediacoderhq.com/dlfull.htm. This information was taken straight from the SMART User Guide available on the SMART website: http://www.smarttech.com.

I hope this helps you beef up your lessons and organize websites and files for an easier flow.

Thursday, December 15, 2011

SMART: Interactives

SMART Notebook and the SMART Exchange have some great interactive activities and templates that are already made for you. They are an easy way to make an activity interactive without putting in a lot of effort. If you haven't found these already, go to the content tab and search through the folders or for a specific item.

When you search, different file options appear. I've shown you how to choose the pictures. This time, click on Interactive and Multimedia. Here, activities, templates, and other items will appear. There are clocks, timers, math tools, sounds, and tons of science activities. Just double click to make it appear on your screen for use.

Here is a great one for first grade science:


I knew these were here, but I hadn't taken much of a look at them before. Thanks to a chat with a teacher, she showed me some things that would be helpful in her classroom. There are many places to get resources when planning your lessons and I would recommend looking through these interactives for ideas when planning those interactive lessons.

You can also visit this website: http://www.skoool.ie/default.asp for more interactive lessons. Many of Skool's resources appear on the SMART Exchange.

Tuesday, November 1, 2011

SMART: Creating A Circle Map

Recently a kindergarten teacher asked me to make a circle map in a notebook for a lesson. She wanted two maps and pictures to put on each map so students could choose the main idea of the pictures. Here is how I made it:

1. Create circles by clicking on the shapes tool and then choosing the circle tool.


2. Draw the circles on the page. Click on the circle to move and resize.


3. Choose pictures by going to the images screen and typing in your keywords in the 
search box. Under the pictures option will be the pictures SMART notebook found. Double click the image or drag it to insert it on your page. 


4. You can click on the image to resize and relocate it on your screen. In my final product I also changed the background colors. When you are ready to use it, students can click and drag the pictures to the appropriate map and write the main idea on the inside circle. Simple, but fun!


For information on changing the background color, go here.


Thursday, October 13, 2011

SMART: Free Resources for Learning

As you know I'm still learning how to use a SMART board and still getting familiar with the software. Luckily, SMART Tech has some free online resources to help me get on my way. I found this site off of the SMART Exchange:

http://www.smarttech.com/us/Resources/Training/Training+Search+Pre-filter

Here you can complete the Free Needs Assessment


When you do, the information you give will help the webpage powers that be know where you need to start in your learning process. Then it will offer up guides and free tutorials that will take you through some good information. I've gone through almost all of it and I feel more comfortable with the program now. The training leaves quite a bit to be desired, but the courses that seem to have the best info. all cost $. It's definitely worth taking the time to look at the free information though. Any little bit can help.

Happy Notebooking!

Thursday, October 6, 2011

SMART: Backgrounds

When you open up SMART Notebook, all you get is a blank white page. How about putting some pizazz on that screen to spruce up your notebook? Today I'll tell you how to set new backgrounds to your pages.

First, go to Format--> Background or Right Click-->Set Background.


A toolbar will come up on the side and give you four options. You can choose a solid color, gradient, pattern, or upload your own picture from the files on your computer.


All are excellent options depending on what your topic is. Solid fill is great to liven up the background of basic interactive activities, as is the gradient fill. The pattern fill really isn't my favorite, but I can see it's value for basic black and white backgrounds if it fits your theme. The image fill is great for science and social studies themes, or even when making activities to go with books the kids are reading in class. Remember you can always add pictures over a colored or gradient background so the picture doesn't take up the whole slide. So now you can spruce up those interactive activities. Don't forget to look for images and other resources on the SMART Exchange!

Wednesday, September 28, 2011

SMART: Board Tools on the Desktop

I'm under the impression that you SMART users are a little more comfortable with your boards since you have had them for a while. Some of you may be new to the school or may have switched from a grade level that didn't have SMART. I know you are overloaded with interims, benchmarks, and just inspiring the kids to pay attention to you, but hopefully today's tip will help you get some extra mileage out of your SMART board and enhance your lessons.

When you turn on your laptop you probably have the SMART board tools open on the side. (If not, you can always open them.) When you click on the arrow button it should act as a mouse. When you use your finger you can click on your desktop just like using a mouse. This means that you can open up websites or Envisions and use the board tools right over the desktop.

Open Envisions from the web (http://www.pearsonsuccessnet.com) or from your CD Roms and make sure the board tools are open too.


Now you can flip pages, zoom in or out, or write over the textbook right there on your board. As I've been in and out of classrooms I've seen people utilizing them with the Envisions Visual Learning Animations which is another great Envisions tool. And students can come up and do it too!

This means other websites and games are literally at your students fingertips. (Pun intended) I'm in the process of organizing my bookmarks so everyone can get to them, but for now you can check out what I have here: http://delicious.com/hilarythomas


Students can play games as a class or for centers.
Or, add notes and highlight pages on the web.


There are many ways to use your SMART board and I know you guys are already doing a great job adding interactivity to your lessons. 


Friday, September 23, 2011

SMART: Downloading and Using Resources

SMART users, I told you I would have some things for you!

I'm finally figuring out this SMART notebook software. The cool thing is, I'm finding it is a lot like ActivInspire for Promethean. That means, easy for me to learn and easy for you to flip back and forth between the two as well. I have checked, and you are able to use ActivInspire on your SMART board. So if you find a better resource on Promethean Planet or like something better in ActivInspire, you can use it.

Just pull up your SMART tools and choose the arrow. Then pull up ActivInspire and you can use all the tools with your fingertips. (You may need to calibrate it first)

You probably want to get into your Notebook software and make your own charts. You can get some awesome resources from the picture browser or from http://exchange.smarttech.com.

If you do not have a SMART Exchange account, now is a good time to register. It is free, and just like Promethean Planet, is a wealth of resources for your SMART board. You can search for Notebook lessons by subject, grades, or file types. To find resources to make your own Notebook lessons, search by File Type.


You can choose images, videos, manipulatives, and other types of files. I recommend browsing through them. You never know what you are going to find! When you find something you like, click Download. 


To get to the resources you have downloaded, open up Notebook. On the right side you will see four icons. Click on the one that looks like a picture. (I have noted that this toolbar is moveable to the other side. If yours is not on the right, it will be on the left.)


Your resources will in folders. Click through the folders to find your resources. You can also search for them in the search box at the top. Your resources will appear under the folders by type (pictures, interactive, etc.) To put it in your notebook, double click or drag the item to the notebook.


Voila! You've got some neat resources to amp up your notebooks. You might even get inspired for a lesson just by browsing through these resources.

Don't forget, the SMART exchange has tons of free Notebook lessons and other types of files to use to make your lessons interactive. I am wowed by some of the things you can do.