Showing posts with label lesson planning. Show all posts

Thursday, January 3, 2013

Activity Builder: SMART Notebook 11

SMART Notebook 11, which has been fully updated with new features has made the software a lot easier to use. For starters, the menu at the top allows for easier adjustments when creating shapes and fonts. The process is much faster and easier to adjust. But another great new feature is the Activity Builder.

The Activity Builder allows the user to put objects on the page and choose one object to be the activity object. Let's say the activity object is the number 4. The other objects on the page either go with the number 4 or they don't.

Once I have the objects on the page, I click on the puzzle icon on the side of my screen. This is the Activity Builder.


To choose the 4 as the activity object, I select the number 4 and reselect the puzzle icon.

Then I click and drag each of the other objects to the "accept" or "reject" boxes in the Activity Builder  menu.


For efficiency, I dragged the three objects to be rejected to the reject box and then clicked "Add All Remaining" in the accept box. Nice to have.

Once all objects that are part of the activity have been added to the appropriate boxes, you can choose to adjust settings or click "Done". In the "Settings" tab on the Activity Builder menu you can choose the animation of the objects, such as fading out or bouncing away.


Now students can come to the board and drag the objects that make the number 4. If they are right, my objects will fade into the 4. If they are wrong, the object bounces back out.


Promethean has a way to make an activity just like this (See "Creating Containers"), but for once, SMART made it a lot easier and faster. Use this activity whole group, small group, or for centers. It allows interaction and instant feedback. Awesome!

Thursday, December 13, 2012

Dropbox: File Storage and Sharing

I wanted to tell you about an application I've been using for a few months now. It's called Dropbox.

Dropbox is basically a folder on your computer, phone, or on the web that holds your documents and pictures and makes them available anywhere else you you have Dropbox downloaded or an internet connection.

All you do is go to the Dropbox website and register for a free account. You then download the application to your computer with a few simple and guided instructions and link the Dropbox folder to your account. The icon will then be visible on your desktop or your tray icons (all those icons near the clock on your screen) And, making the app even easier to use, instructions are in each folder to tell you exactly how to save and share.


Whenever you have a file you'd like to be able to access from home, school, or on the go, just open Dropbox and move a copy of the file there. It will automatically update the folder and when you get to your next device the file will be there. This is great for lesson plans, worksheets, PDF files, pictures, and anything else you can think of.

You don't even have to be on a computer that has Dropbox downloaded to it, because you can access your account via the Dropbox website and still download and store or open files.


Download the app on your home computer, school laptop, and even get the app for your phone.


The other great thing about Dropbox is that you can choose files you'd like to make public and share those files with other Dropbox members. Maybe you want to share some project files with your team. Just drop them in your folder, right-click and choose "Share Link". The website will open up with the option to email your team members the link to your file or copy the link and paste it into your own location. This would be great for emailing the file to students or team members, storing and sharing lesson plans, and making sure you have your files even if your primary computer goes down for the count. 

A free account only comes with a certain amount of storage, so I find myself deleting files I don't need anywhere access to when I'm done with them and storing them in another location. For small fees you can upgrade your storage. Either way you choose, Dropbox is useful for file storage, anywhere availability, and file sharing. 

Thursday, December 6, 2012

Gaggle, You Tube Education, and 2 More Resources

Welcome to your Tech Tips of the Week, Blog Edition.
Featured: Gaggle Tips, You Tube Education, Scholastic Storia, and Internet 4 Classrooms Online Tutorials

1. Gaggle:
I gave you an introduction to Gaggle a few weeks ago. (Get started here.) I have seen quite a few classes start to use it in big and small ways. Some teachers use it to have students turn in assignments from the computer lab. One class has begun using the discussion boards feature under My Classes for students to open dialogue about the novel they are currently reading. And, I can see in Gaggle Tube that many teachers have been saving videos to their My Videos folder for streaming in class.

These are just a few examples of the Gaggle use going on here at school. If you are using Gaggle in the classroom, share how you are doing it by leaving a comment below.

Also, I have saved some Christmas Traditions videos in my folder on Gaggle. You can access these videos through Gaggle Tube in the "School Library" folder. Just click on my name. Tip: When saving videos, I find it is good to add tags to them for easy organization. That way I can save many videos, but not have to scroll through all of them to find them. When saving a video, make sure to check "approve for student use" so students and other staff members can look through your videos too.


2. You Tube Education:
Now accessible here at school! You Tube started offering You Tube EDU a little while ago. Similar to Teacher Tube, You Tube EDU has thousands of lessons and educational videos to stream right to your classroom. You can make your own account and add your own videos as well. Our county recently opted into You Tube EDU on our network, so we can browse, search, and watch videos from a defined set of educational content. This means that sometimes you may come across videos that are not accessible on our network because it is either not suitable, or doesn't fit into the defined set of terms. I recommend searching for videos to use while you are here at school or at least testing if your videos will open here at school before committing them to a lesson. The great thing is there are many videos to choose from and unlike Gaggle Tube, you have the ease and flexibility of searching like you would regularly from the web instead of going through Gaggle Tube. (Both are great options.)

3. Scholastic Storia:
Storia is a new download from Scholastic. It is a way to download e-books purchased through Scholastic but with a few more features, like a dictionary and read aloud. Check out the site. You may not have tablets to download these ebooks in the classroom, but you can use the app with your devices at home or share this new resource with parents. Really neat!

4. Internet 4 Classrooms:
Internet 4 Classrooms has online technology tutorials available here. If you need a refresh before starting that Power Point project or want to see some of the differences between Word 03, 07, and 10, check them out here. The Web 2.0 Tools link gives some great tutorials on tools you can use in your classroom to make your lessons more engaging or to help you get more organized.

Happy Teching!

Thursday, October 18, 2012

Getting Started with Gaggle

Gaggle is email, social network, discussion board, digital storage, and more all rolled into one. It's also incredibly safe for students to use. Here's all the information you need to get started on Gaggle today.

1. Gaggle has so many capabilities, don't worry about using them all. As you use Gaggle, decide what to use and what just doesn't work for your classroom needs.

2. When you log in, you will see your personal dashboard and navigation tabs at the left. This dashboard is customizable.


3. To start off with, Gaggle can be used for email. Students can email you, you can email students, and students can email each other. Everything in Gaggle is immediately run through a filter before getting sent out, so if there is something non-kosher that is written it will be flagged and not sent.

The mail tab can be accessed on the left or on the top.


4. Gaggle also has ways of organizing and sharing things with your students. Your "My Classes" tab has your classes. (If you are in OCS, your classes have been downloaded automatically from NCWise. If you are not, you will have to create student accounts and create your classes.) Just click on the class you want to work with and there are a few options available.


You can share information on the class wall, share photos from field trips, and upload documents used in class for students to access from home. You can create assignments and have students submit the assignment through Gaggle. You can also create class discussion boards for discussions on any topic, like their thoughts on the book read in class or their favorite historical figure.

5. Gaggle is also known for its applications. Apps include blogs, a digital locker, Gaggle Tube, and social networking.

Gaggle Tube: Filtered You Tube you can access at school! You are able to search for videos. If it is an inappropriate video, the video will be highlighted pink. Anything else is available to view. You can also save the video to "My Videos" to access later. You will have to play the video through Gaggle. There is not a way to download and save the video. But hey, at least you know nothing inappropriate is going to pop up!


You can access "My Videos" on the left hand side of the browsing screen. You can also search the School Library to see what other teachers are showing. This is great for someone who found a video they want to share with their grade level team. Each team member could just look under that teacher's folder and find the video to share.

Digital Locker:
You can upload and store files here. You can access these files from anywhere on any computer. So long Student Share! Have students save their work on the student share, but then upload it to their digital locker. They can work on it from anywhere, including home. They can also then submit assignments through Gaggle. And teachers can access their students digital lockers by finding the student in the Student Admin section.


You also can keep your files to yourself or enable sharing. Just click on the blue link under the Sharing column. You can choose to email and invite others to view your document. A good idea if you want to share something with your team or committee. You can also choose People with Access  tab and give others access to either view or edit. 

This is an option for students too, so they can share documents with classmates in a group and edit the document together. 


Social Networking: Other capabilities of Gaggle are the Social Wall and Chat options. If you click on Social Wall you can make your own profile and even add friends. You can then chat with those friends using the chat feature at the bottom right of your screen. This is a fun way to add a personal touch and get to know your students and other staff. Students can feel like they have social networking options, but still communicate in a safe space. Just like everything in Gaggle, even the conversations in the Chat feature go through the filter before they are delivered. Great way for students to communicate safely with no room for bullying!


This is a great way to get started with Gaggle. There are so many ways to use this tool in your classroom. If you have more questions, check out the Training Videos also available in the Applications tab.

Thursday, September 20, 2012

SMART Exchange Resources

The SMART website is a good resource for training and tips to enhance your lessons. Whether a beginner or more advanced, you'll probably still find something new. A good place to start is http://www.smarttech.com. (This is different from the SMART Exchange where you can download lessons.) On the top navigation, go to Resources and click on Training and Professional Development.

Scroll down the page and you have a few options. I suggest checking out the Free Resources or the Training for Education sections.

The Free Resources section has short tutorials or PDFs with step by step directions.  (Find the "more" button to expand each section to browse said tutorials.)


Many of these are much like the other tutorials I put on this blog. Short, step-by-step, with pictures to help you learn to do one thing at a time. As someone who has not actually taught with a SMART board in my classroom (I had Promethean), everything I've learned about SMART has been self taught or learned by searching resources like this. I was very excited to come across these guides. I learned some new, very fun things to put in my notebooks.

Like the magnifying glass:


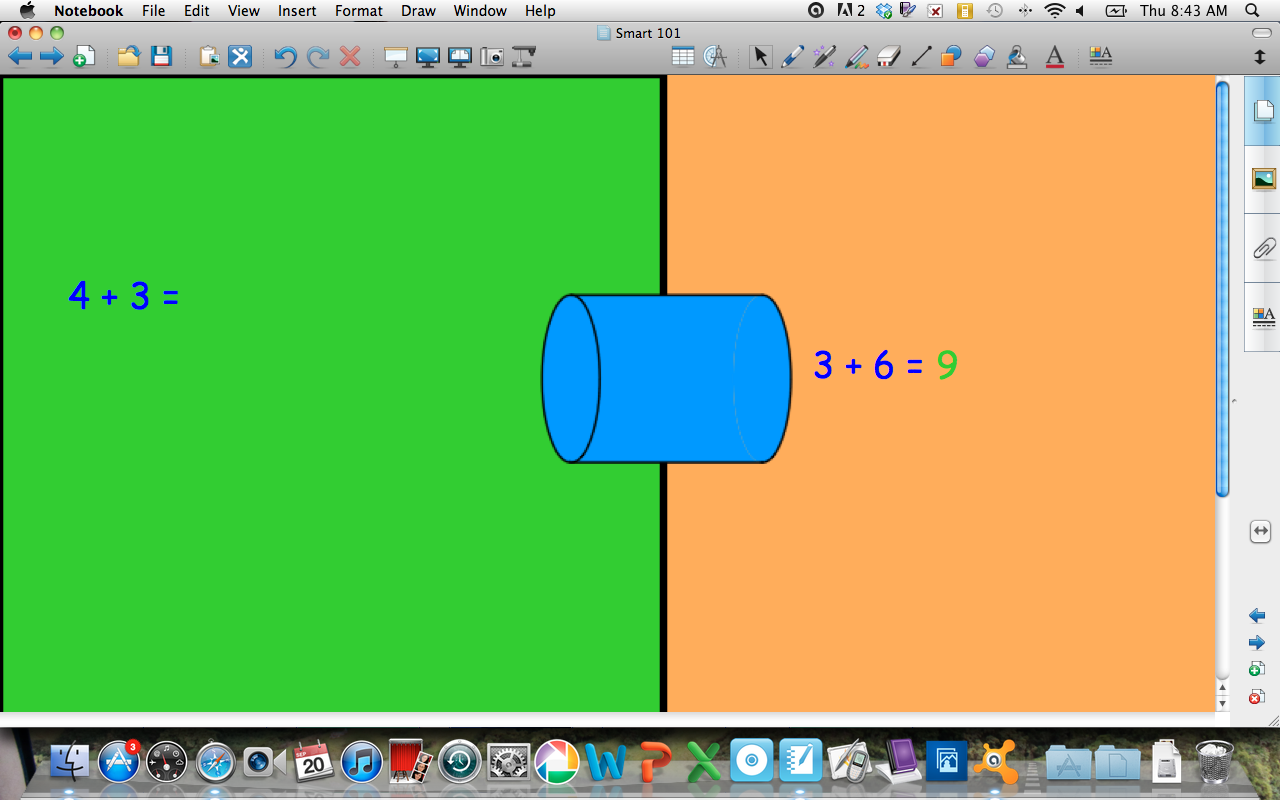
And the Magic Tunnel:


I recommend revisiting this site often to find new ways to add interaction to your lessons.

Thursday, May 17, 2012

Student Created Technology Projects

Just as we use technology to enhance our lessons, there are many ways that students can use technology to demonstrate or further their understanding. Like the digital storytelling we've talked about before, students can create other projects from in-class lessons and independent research. These projects can be created using computer or web based software. There are hundreds of websites, programs, and projects out there. Here are just a few software and project ideas to get you started:

Software you may already find at your school:

Microsoft Office: Word, Power Point, Publisher, Excel
© Microsoft
Windows Movie Maker
Audacity
Photostory

Web Based Projects:

Glogster ($)
Prezi (There are ways around the "no one under 13" rule and allows you to be the sole owner of the account. Read about it here.)
Posters for Teachers
Big Huge Labs (create magazine covers, movie posters, or other fun items from photos.)
Weebly
Wikispaces


© Prezi Inc.

A student project can be as easy as a Word document or Power Point, or more involved like Glogster or Prezi. Either route you choose, students can add photos, embed videos, add animation, sound, timing, flashy colors and fonts, and whatever else their imaginations desire.

Ten Ideas for Student Created Technology Projects:

1. Poster : Such as: Biography, Safety, Animals, Characters.

2. Video: Such as: How-to, commercial, acting out a scene from a play, book, or their own writing.

3. mp3: Such as: How-to, Public Service Announcement, advertisement, writing and poetry.

4. Digital Storybook

5. Brochure: Such as: geographical destinations, biomes or landforms, biography.

6. Presentation: Such as: biography, animals, how-to

© Weebly, Inc.
7. Map: Geographical locations, places to travel, map routes different peoples have taken

8. Data Graphs

9. Webpage

10. Scrapbook Page


It might be the end of the school year, but it's not too early to think about projects that can be planned for next year!


Tuesday, March 13, 2012

Symbaloo

I have recently been introduced to a website called Symbaloo. Symbaloo is a bookmarking website that saves your bookmarks in a unique way. It's also not really JUST a bookmarking site, but a place that you can bookmark files, videos, pictures, and more. These can all be saved on something Symbaloo calls a "webmix" and then accessed all from the same page. I'll show you how some of this works.

After going to http://www.symbaloo.com/ and creating an account, you will see that Symbaloo has given you some automatic webmixes for you to start off with. You can edit them or delete them as you like. 


In the middle of each webmix is a Google search box. This box is also where some of your other icons are viewed.


This is a sample webmix about Dolphins:


When I click on a video, the video views in the middle of the screen right away.


The same is true for pictures:

Both of these came from icons in the webmix. So if you were doing a unit on dolphins, you could store all your resources here and have easy access to them. 

You can also share your webmixes with other teachers and parents, or add students and give students access to the webmixes. 


If you want to find webmixes that are already made, such as the dolphin webmix above, you can search for webmixes on Symbaloo and add them to your tabs. 

Here's how:
Go to the Symbaloo Gallery and enter your search in the box. 


Find one you like and click on it to preview.


The preview will give you a little more information about the webmix and it's author.


Once you add the webmix you like, you will be able to find it again in your tabs.


If you want to create your own webmix, you can go to Add a Webmix to get started.


You will name your webmix:


Then add the address of the website. When you type in the URL and then click in the box to create a tile, Symbaloo will automatically find the name for the tile based on the website you entered. You can then edit the name if you wish.


Then you'll design your tile by choosing a background, icon, and how the name is displayed.


When you are done, click Add Tile To Webmix and drag the tile to the desired location.
It's ready to use!


Repeat these steps each time you have a website, image, or video to add to your webmix.

Thursday, March 1, 2012

SMART: Magic Pen

SMART Notebook 10 has a feature called Magic Pen. I recently discovered some new ways to use it.

You can find Magic Pen next to your other pen icons:


The first time I clicked on the icon all I discovered was a pen tool that works like disappearing ink. You write, and within a few seconds it begins to fade away and disappear. That could be kind of cool if you are wanting to highlight something only for a moment.

You see here how what I wrote first is starting the fade away:


There are two ways to use Magic Pen that I didn't know before.

To create a spotlight:

1. Click on Magic Pen and draw a circle.


Once your circle is drawn and you life the pen off the board, a spotlight will appear.


You can resize the circle and move the spotlight around to reveal smaller portions of your picture or text at a time.


To create a magnifier:

1. Click on Magic Pen and draw a rectangle.


2. Once your rectangle is drawn and you lift the pen off the board, a magnifier will appear.


You can move the magnifier around on the screen and resize it to magnify different parts of your picture or text.

These are just two new things I learned that I thought I'd share. It definitely adds another element to your lessons and would be easy for a student to do as well.

Thursday, February 2, 2012

SMART: Standards Correlated Lessons

Did you know there is an easy way to search for lessons that go with specific standards? When you go to the SMART Exchange website, click on the tab on the top navigation bar labeled "Standards Correlated Lessons". Using the drop down menus, input your state, standards, and subject. Then hit "View"


The standards will appear and so will lessons to go with each.


Totally simple way to get lessons that you know are right on the money, instead of searching through pages and pages of notebooks.