Thursday, December 13, 2012

Dropbox: File Storage and Sharing

I wanted to tell you about an application I've been using for a few months now. It's called Dropbox.

Dropbox is basically a folder on your computer, phone, or on the web that holds your documents and pictures and makes them available anywhere else you you have Dropbox downloaded or an internet connection.

All you do is go to the Dropbox website and register for a free account. You then download the application to your computer with a few simple and guided instructions and link the Dropbox folder to your account. The icon will then be visible on your desktop or your tray icons (all those icons near the clock on your screen) And, making the app even easier to use, instructions are in each folder to tell you exactly how to save and share.


Whenever you have a file you'd like to be able to access from home, school, or on the go, just open Dropbox and move a copy of the file there. It will automatically update the folder and when you get to your next device the file will be there. This is great for lesson plans, worksheets, PDF files, pictures, and anything else you can think of.

You don't even have to be on a computer that has Dropbox downloaded to it, because you can access your account via the Dropbox website and still download and store or open files.


Download the app on your home computer, school laptop, and even get the app for your phone.


The other great thing about Dropbox is that you can choose files you'd like to make public and share those files with other Dropbox members. Maybe you want to share some project files with your team. Just drop them in your folder, right-click and choose "Share Link". The website will open up with the option to email your team members the link to your file or copy the link and paste it into your own location. This would be great for emailing the file to students or team members, storing and sharing lesson plans, and making sure you have your files even if your primary computer goes down for the count. 

A free account only comes with a certain amount of storage, so I find myself deleting files I don't need anywhere access to when I'm done with them and storing them in another location. For small fees you can upgrade your storage. Either way you choose, Dropbox is useful for file storage, anywhere availability, and file sharing. 

Thursday, December 6, 2012

Gaggle, You Tube Education, and 2 More Resources

Welcome to your Tech Tips of the Week, Blog Edition.
Featured: Gaggle Tips, You Tube Education, Scholastic Storia, and Internet 4 Classrooms Online Tutorials

1. Gaggle:
I gave you an introduction to Gaggle a few weeks ago. (Get started here.) I have seen quite a few classes start to use it in big and small ways. Some teachers use it to have students turn in assignments from the computer lab. One class has begun using the discussion boards feature under My Classes for students to open dialogue about the novel they are currently reading. And, I can see in Gaggle Tube that many teachers have been saving videos to their My Videos folder for streaming in class.

These are just a few examples of the Gaggle use going on here at school. If you are using Gaggle in the classroom, share how you are doing it by leaving a comment below.

Also, I have saved some Christmas Traditions videos in my folder on Gaggle. You can access these videos through Gaggle Tube in the "School Library" folder. Just click on my name. Tip: When saving videos, I find it is good to add tags to them for easy organization. That way I can save many videos, but not have to scroll through all of them to find them. When saving a video, make sure to check "approve for student use" so students and other staff members can look through your videos too.


2. You Tube Education:
Now accessible here at school! You Tube started offering You Tube EDU a little while ago. Similar to Teacher Tube, You Tube EDU has thousands of lessons and educational videos to stream right to your classroom. You can make your own account and add your own videos as well. Our county recently opted into You Tube EDU on our network, so we can browse, search, and watch videos from a defined set of educational content. This means that sometimes you may come across videos that are not accessible on our network because it is either not suitable, or doesn't fit into the defined set of terms. I recommend searching for videos to use while you are here at school or at least testing if your videos will open here at school before committing them to a lesson. The great thing is there are many videos to choose from and unlike Gaggle Tube, you have the ease and flexibility of searching like you would regularly from the web instead of going through Gaggle Tube. (Both are great options.)

3. Scholastic Storia:
Storia is a new download from Scholastic. It is a way to download e-books purchased through Scholastic but with a few more features, like a dictionary and read aloud. Check out the site. You may not have tablets to download these ebooks in the classroom, but you can use the app with your devices at home or share this new resource with parents. Really neat!

4. Internet 4 Classrooms:
Internet 4 Classrooms has online technology tutorials available here. If you need a refresh before starting that Power Point project or want to see some of the differences between Word 03, 07, and 10, check them out here. The Web 2.0 Tools link gives some great tutorials on tools you can use in your classroom to make your lessons more engaging or to help you get more organized.

Happy Teching!

Thursday, October 18, 2012

Getting Started with Gaggle

Gaggle is email, social network, discussion board, digital storage, and more all rolled into one. It's also incredibly safe for students to use. Here's all the information you need to get started on Gaggle today.

1. Gaggle has so many capabilities, don't worry about using them all. As you use Gaggle, decide what to use and what just doesn't work for your classroom needs.

2. When you log in, you will see your personal dashboard and navigation tabs at the left. This dashboard is customizable.


3. To start off with, Gaggle can be used for email. Students can email you, you can email students, and students can email each other. Everything in Gaggle is immediately run through a filter before getting sent out, so if there is something non-kosher that is written it will be flagged and not sent.

The mail tab can be accessed on the left or on the top.


4. Gaggle also has ways of organizing and sharing things with your students. Your "My Classes" tab has your classes. (If you are in OCS, your classes have been downloaded automatically from NCWise. If you are not, you will have to create student accounts and create your classes.) Just click on the class you want to work with and there are a few options available.


You can share information on the class wall, share photos from field trips, and upload documents used in class for students to access from home. You can create assignments and have students submit the assignment through Gaggle. You can also create class discussion boards for discussions on any topic, like their thoughts on the book read in class or their favorite historical figure.

5. Gaggle is also known for its applications. Apps include blogs, a digital locker, Gaggle Tube, and social networking.

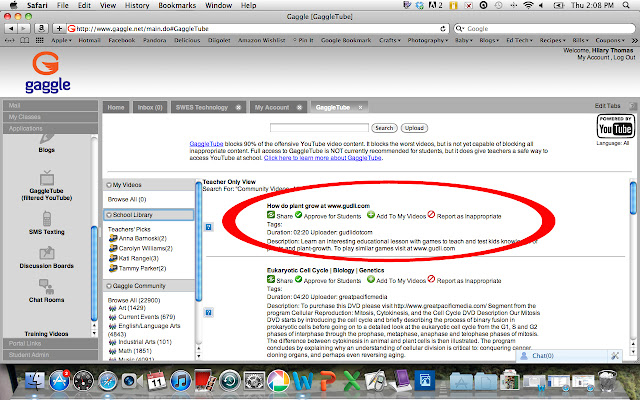
Gaggle Tube: Filtered You Tube you can access at school! You are able to search for videos. If it is an inappropriate video, the video will be highlighted pink. Anything else is available to view. You can also save the video to "My Videos" to access later. You will have to play the video through Gaggle. There is not a way to download and save the video. But hey, at least you know nothing inappropriate is going to pop up!


You can access "My Videos" on the left hand side of the browsing screen. You can also search the School Library to see what other teachers are showing. This is great for someone who found a video they want to share with their grade level team. Each team member could just look under that teacher's folder and find the video to share.

Digital Locker:
You can upload and store files here. You can access these files from anywhere on any computer. So long Student Share! Have students save their work on the student share, but then upload it to their digital locker. They can work on it from anywhere, including home. They can also then submit assignments through Gaggle. And teachers can access their students digital lockers by finding the student in the Student Admin section.


You also can keep your files to yourself or enable sharing. Just click on the blue link under the Sharing column. You can choose to email and invite others to view your document. A good idea if you want to share something with your team or committee. You can also choose People with Access  tab and give others access to either view or edit. 

This is an option for students too, so they can share documents with classmates in a group and edit the document together. 


Social Networking: Other capabilities of Gaggle are the Social Wall and Chat options. If you click on Social Wall you can make your own profile and even add friends. You can then chat with those friends using the chat feature at the bottom right of your screen. This is a fun way to add a personal touch and get to know your students and other staff. Students can feel like they have social networking options, but still communicate in a safe space. Just like everything in Gaggle, even the conversations in the Chat feature go through the filter before they are delivered. Great way for students to communicate safely with no room for bullying!


This is a great way to get started with Gaggle. There are so many ways to use this tool in your classroom. If you have more questions, check out the Training Videos also available in the Applications tab.

Thursday, October 4, 2012

Top 10 School In Sites Website Tips


In no particular order...

1. Page Setup- Make sure you have the status box checked for all pages you wish to have active.

2. Rename pages to fit with their use.

3. Change your start page (the page that first appears when someone chooses your name from the staff list).

4. Add pictures to your pages.

5. Add files, like newsletters, homework, or permission slips so parents can access a digital copy. Many different file types can be added here.

6. Put links in your text, such as your Bio page or Custom Page.

7. Put Links on your Links Page.

8. Keep your calendar updated on class events and field trips. 

9.  Upload your classroom presentations for viewing at home or for students to access through another computer. 

10. Visit the Help section at the bottom of your left navigation or the Video Tutorial Library from the top navigation on your screen. Very helpful step-by-step directions!


Each link goes to a step-by-step tutorial in PDF format. Make sure you have Adobe Reader to view the files. 


Thursday, September 20, 2012

SMART Exchange Resources

The SMART website is a good resource for training and tips to enhance your lessons. Whether a beginner or more advanced, you'll probably still find something new. A good place to start is http://www.smarttech.com. (This is different from the SMART Exchange where you can download lessons.) On the top navigation, go to Resources and click on Training and Professional Development.

Scroll down the page and you have a few options. I suggest checking out the Free Resources or the Training for Education sections.

The Free Resources section has short tutorials or PDFs with step by step directions.  (Find the "more" button to expand each section to browse said tutorials.)


Many of these are much like the other tutorials I put on this blog. Short, step-by-step, with pictures to help you learn to do one thing at a time. As someone who has not actually taught with a SMART board in my classroom (I had Promethean), everything I've learned about SMART has been self taught or learned by searching resources like this. I was very excited to come across these guides. I learned some new, very fun things to put in my notebooks.

Like the magnifying glass:


And the Magic Tunnel:


I recommend revisiting this site often to find new ways to add interaction to your lessons.

Thursday, September 13, 2012

Introducing Sumdog!

Sumdog is actually a pretty neat site that is easy to implement in your classroom. It is basically a site with math games for students. The students get their own account and avatar. The incentive to play and do well is as they play games, get right answers, and earn coins, they can use their rewards in the Sumdog store. The store allows them to add things to their avatar, like new clothing, musical instruments, sports equipment, or even play other games.

To get started, go to http://www.sumdog.com and register for your FREE account. When you do, you'll be given a username and a "request to join" will be sent. Another teacher at the school will have to log in and "approve" you to join before you will be able to log in. This is just a safeguard to make sure the correct teachers are making accounts for the correct school.

Once approved you'll need to add your students to create free accounts for them. It will give you usernames and passwords for all of your students.


If you go to "Students" and select your class, there is also a print out that you can pass out to the students with their information already on it. Just hit print. Have them keep it in a safe place. They can access the site from school or from home.


The URL you will want students to use for their "quick login" is:
http://www.sumdog.com/sch/southwest-elementary-school

*Give this to students to access at home and add this page to your favorites (or Symbaloo!)

The other thing you'll want to do is to restrict student skills. All the games are the same for all grade levels, but each student plays according to their skills. If you don't restrict the skills you could end up with a kindergartener trying to do a multiplication problem in their game. (Unless, of course, you have a kindergartener who is able to do a multiplication problem.)

To do this go to "Southwest" at the top of your screen.
Choose "Skills"


Choose "Students"

Edit by choosing "restrict their skills"


Then you will be able to choose according to grade level. You can always go back and change this for students who are experiencing difficulty or need more challenging games.

Now your students are ready to play!

Other information you should know to start out:
The Sumdog Blog has great information:


You can get students to join national, state, and county competitions. Just another way to give students an incentive to play.


Sign up, try it out, and let me know how you think it works for you. 

Thursday, August 30, 2012

Creating a Symbaloo Webmix

Need (or just want!) all your bookmarks in one place? Need them to be accessible from any computer?

Check out Symbaloo. I wrote about it before here.

Now I'm going to go through again and give you step by step directions again on creating a webmix and then how to get the URL to make it a page accessible to anyone.

First, you'll need to have a Symbaloo account. It's free and easy. Just go to http://www.symbaloo.com and register.

Now that you've done that, follow the directions below.

1. Click "add a webmix" from the top of the screen.


2. Choose a name for your mix and hit "create my webmix"


3. To add tiles, hover over a blank tile and it will say "add tile". Click.

4. At the top of the screen you can type in the name to see if there is an existing tile. Popular sites will probably already have a tile made. If you can't find an existing tile, click "create  your own tile".


5. This will bring you to a screen where you can put in the website for your tile. Choose how you would like the name to appear and check the box if you want the name to show up on the tile. Choose a background color and an icon for your tile. Then hit "create tile".


6. Now click and drag the tile to where you would like it to be located. You can always move tiles to new locations or delete them.

7. Once you have put all your tiles in you can access the webmix whenever you are logged in to Symbaloo. If you would like others to be able to access your webmix or to be able to save this specific webmix as your homepage on student computers you will want to hit "share".


8. Enter in the name and a description if you'd like. It's not necessary though. Click "share my webmix"


9. On the right side of the screen you will see your URL. Copy this address and share it wherever you need.


If you want it to be the homepage on student computers, go to the computer and log in as a student. Open Internet Explorer and type in the URL for your webmix. Then find the icon on the top toolbar that looks like a house. Click on it to make this Symbaloo webmix the homepage.

Now when students open Internet Explorer they will have the webmix right there. You can put common sites that they will access regularly all right there. You could also create a webmix with sites specific to topics you are working on right now. Change out the homepage as often as you'd like. If you are doing a research project, just have students type in the URL to get to a webmix you create of sites specific to the project. Since they aren't logged in and won't have an account, students won't be able to edit (read: delete or change) anything on the webmix. So it's safe for everyone to use!

You can check out the one I made for a 5th grade project here: http://www.symbaloo.com/mix/explorers4


Online bookmarking websites are not new, but this one is fun looking and user friendly.

Sunday, July 22, 2012

The Wonderful World of Edmodo

I've heard of Edmodo, visited it once or twice, and didn't give it much thought until I took a look at it again recently. It's totally amazing. (And yes, I just said totally.) Edmodo is a FREE(!) online community for your classroom that allows teachers and students to interact. It's kind of like  a Facebook-Wikispaces-gradebook-Gaggle-Blogger all rolled into one. To add to the awesomeness, there are many ways that Edmodo is 100% safe for students to use and gives the teacher full control of all content.

Start here. When you create your (free and 5 seconds to make) account, your basic dashboard looks like this:


You can add a picture and a few details to your profile. You can join groups (you might notice I've joined the Edmodo New User Group) or create groups. For use in your classroom, you'll want to create groups for your class as a whole group, by subject, or maybe even by reading or word study groups.


You can then add assignments:


 Quizzes: (That can be automatically graded. Time saver!)


Keep track of grades:


And store files in your library so you can access them for other assignments and posts:


For more information, I highly encourage you to visit the Edmodo Blog and watch several of the webinars that are available to view at any time.


Excited yet? Who wants to use this in their classroom this year?!

Morning Routines

As we approach the beginning of the school year we know we will have students who are new to interactive whiteboards, or at least need a refresher course. A great way to get students used to using the board is by making it part of your morning routine. Plus, you're already starting the day out using technology!

Check out Promethean Planet or SMART Exchange and search for "lunch count" or "attendance". You'll find plenty of templates, even by holidays and seasons. You can download them and change them as you'd like. An added organizational bonus: Use "save as" to save each lunch count/attendance to a special folder and refer back to it if you can't remember when a student was absent or how many students ordered pizza.


You can also change these templates around to use them as a poll for anything from gauging student interest to asking students to predict the weather or what will happen next in the book you are reading. You could have students use their own names or simply use shapes or icons to make the voting anonymous. There are also a few morning calendar routines on the sites, but you may want to use them as a jumping off point to creating your own. 

Wednesday, June 6, 2012

Social Networking for Teachers

The Facebook IPO may not have panned out as well as investors thought, but social networking still has great benefits, especially for teachers interested in collaborating with others and learning more. Here are a few great networking  and learning sites for teachers:

TeachHub: Join the Teach Hub community for free and gain access to updated articles, blogs, lesson plans, and discussion forums. Sign up for weekly updates, start or participate in discussions, share what you are doing in your classroom, and connect with other teachers. 

SimpleK12: Ok, this isn't actually a networking site, but it does have a blog and some free training via webinars for technology. There is plenty of free content and information, but also a paid version that gives you access to even more great training. Sign up for emails and be alerted when membership fees go on sale. 

TeachAde: An online community for teachers to browse lesson plans, articles, and videos or connect with other teachers. Join groups and discussions and share your resources with others. TeachAde is free for K-12 educators with great resources. 

Classroom 2.0: A social network for educators interested in technology to use in their classroom. Join in forums, view live training, and connect with other teachers to collaborate and share ideas. Really neat technology information at this site!

We The Teachers: Another social networking site to collaborate and share ideas with other educators. Free to join. Search for resources, tools, and groups to be a part of. 

ISTE Connect: The International Society for Technology in Education has a place to connect with other educators using technology in their classrooms. Network with others via blogs, wikispaces, Twitter, and other social networks. ISTE does have a membership fee, but also has great information and resources for learning more about integrating technology. 

Don't discount Facebook groups and Twitter as great ways to discussion education and share ideas as well. Check these out over the Summer as you prepare for next year. And really be sure to check out the webinars that some of these sites offer. I learn most of what I know about instructional technology through these trainings that I can view on my own time. You can view and learn from the comfort of your own couch! 

Thursday, May 24, 2012

Slideshow Creators

It's nearing the end of the school year, yay! Have you been collecting pictures of students working, science experiments, field trips, and awards? Well, put them in a slideshow to share with your class and their parents. Have 10 or 15 minutes? Here are a few quick and easy (and free!) slideshow creators to use:

Smilebox: A free download with neat templates for creating slideshows, collages, and more. Easily upload your photos, drag and drop, and choose background music. So easy! Save it on your computer, burn to DVD, or share via email.


Photosnack: Web-based, upload photos from multiple places, choose backgrounds, and share. You should be able to embed this to your website too!


Photopeach: Add photos, choose background music, and share! Incredibly easy, and it will pan and zoom through the photos seamlessly. You can download a copy when you are done. Watch again from the website.


You could also use Windows Movie Maker or iPhoto which take a bit more time, but allow for your own personal creativity.

Thursday, May 17, 2012

Student Created Technology Projects

Just as we use technology to enhance our lessons, there are many ways that students can use technology to demonstrate or further their understanding. Like the digital storytelling we've talked about before, students can create other projects from in-class lessons and independent research. These projects can be created using computer or web based software. There are hundreds of websites, programs, and projects out there. Here are just a few software and project ideas to get you started:

Software you may already find at your school:

Microsoft Office: Word, Power Point, Publisher, Excel
© Microsoft
Windows Movie Maker
Audacity
Photostory

Web Based Projects:

Glogster ($)
Prezi (There are ways around the "no one under 13" rule and allows you to be the sole owner of the account. Read about it here.)
Posters for Teachers
Big Huge Labs (create magazine covers, movie posters, or other fun items from photos.)
Weebly
Wikispaces


© Prezi Inc.

A student project can be as easy as a Word document or Power Point, or more involved like Glogster or Prezi. Either route you choose, students can add photos, embed videos, add animation, sound, timing, flashy colors and fonts, and whatever else their imaginations desire.

Ten Ideas for Student Created Technology Projects:

1. Poster : Such as: Biography, Safety, Animals, Characters.

2. Video: Such as: How-to, commercial, acting out a scene from a play, book, or their own writing.

3. mp3: Such as: How-to, Public Service Announcement, advertisement, writing and poetry.

4. Digital Storybook

5. Brochure: Such as: geographical destinations, biomes or landforms, biography.

6. Presentation: Such as: biography, animals, how-to

© Weebly, Inc.
7. Map: Geographical locations, places to travel, map routes different peoples have taken

8. Data Graphs

9. Webpage

10. Scrapbook Page


It might be the end of the school year, but it's not too early to think about projects that can be planned for next year!