Thursday, December 15, 2011

SMART: Interactives

SMART Notebook and the SMART Exchange have some great interactive activities and templates that are already made for you. They are an easy way to make an activity interactive without putting in a lot of effort. If you haven't found these already, go to the content tab and search through the folders or for a specific item.

When you search, different file options appear. I've shown you how to choose the pictures. This time, click on Interactive and Multimedia. Here, activities, templates, and other items will appear. There are clocks, timers, math tools, sounds, and tons of science activities. Just double click to make it appear on your screen for use.

Here is a great one for first grade science:


I knew these were here, but I hadn't taken much of a look at them before. Thanks to a chat with a teacher, she showed me some things that would be helpful in her classroom. There are many places to get resources when planning your lessons and I would recommend looking through these interactives for ideas when planning those interactive lessons.

You can also visit this website: http://www.skoool.ie/default.asp for more interactive lessons. Many of Skool's resources appear on the SMART Exchange.

Promethean: Magic Ink

When I first started using Activinspire, I took some time to play around with the tools in the tools menu; each one useful and pretty self explanatory. But then I came across "magic ink". It was not magical. It was not ink. It didn't do anything. Of course, that's because I didn't know how to use it.

Now that I know, it's still not very magical, but it can be really useful. Magic Ink can be used as a sort of "scratch off" tool. You can hide words or pictures behind other words or pictures and use Magic Ink to "scratch off" the top layer, revealing what is underneath. It has a similar function to the transparency slider, or even using the eraser tool or other shapes for the same purpose. But this time it has a cool name and adds variety to how you reveal the information.

Here's how to work it:
1. Choose what you want to hide and what you want to reveal. I have chosen to hide a word answer below a picture.
2. Insert your items in the chart.


3. Go to the Property Browser. You will see three layers options: Top, Middle, and Bottom.  I have put text below each of my pictures to reveal using the tool. Magic Ink only "scratches off" items that are in the top layer.
4. Move all the items you want to scratch to the Top Layer. Make sure the items you want revealed are in the Middle Layer.


5. Go to the main toolbar (or Tools--->Magic Ink) to choose the Magic Ink tool. If you don't see the Magic Ink icon, go to tools. Mine is on my toolbar because it has recently been used.


6. Use the Magic Ink tool to scratch off the picture revealing the words below.


Thursday, December 8, 2011

Mimio: Getting Resources and Learning New Tricks

Mimio is very similar to an interactive whiteboard, it just takes up less space. Even the software is similar to other versions of whiteboards. You open it up and have options to create pages and use the tools. 

Things you may find useful when using Mimio:
1. http://www.mimioconnect.com/  Go. Make an FREE account. Search for lessons and activities that are already made for you!


When you find one you like, click on it for more information. Then download it to your computer for viewing. If you like it, save it. If not, just toss it. (The file, not your computer. In case you were wondering.)


Also, there are great resources at our school for Promethean and SMART. You can use these files with your Mimio. The pen basically just acts as a mouse. You can use it as such for navigating through your computer while using the Mimio. You can also open Activinspire or SMART Notebook and use activities similarly to if you had the actual board. Just have your Mimio Toolbar open and set to the arrow. Then use the toolbars in the other programs to do your activities. 


And of course, you can also use interactive websites on your board using the pen to navigate. Check out these great sites:


Wednesday, December 7, 2011

Promethean: Transparency Slider

The reason I love using ActivInspire software is because there are SO many little tricks to make a lesson fun and interactive. One of these tricks is the transparency slider.

The transparency slider lets you take an opaque image and make it transparent. This allows you to reveal things hidden underneath the opaque image. This is neat for showing pictures of changes over time, which is what I have mostly used it for. You could also use it to reveal answers.

To use the transparency slider:
1. Choose your images.
2. Layer the images one on top of the other. (For this one, I layered pictures of places before Hurricane Irene and put pictures of the aftermath on top.) Make sure to make the pictures the same size.
3. Click on the picture and the tools will appear at the top.
4. The Transparency Slider looks like a sun. Tap and hold it, a bar will appear. You can drag the slider back and forth on the line. Your top image will become transparent and reveal the image beneath it.

Transparency Slider:

As you drag, you can see the top picture disappearing and the new picture appearing:


New picture:


Another example:

Thursday, December 1, 2011

Promethean: Hiding Objects

An easy way to make a flipchart interactive is to have an activity that hides or reveals information. I've made several flipcharts using this interactive activity. Here's how it's done:

Hiding Objects:
I made a flipchart where I wanted the students to sort pictures into what a bear would need for hibernation and what he wouldn't. I found some pictures of items a bear would and would not need, and then a picture of a bear.

1. Place the pictures in the flipchart.


2. Go to the Object Browser.
3. Place the images and/or text you want to "hide" under the main image in the list. Place the images and/or text you do not want to "hide" above the main image in the list.
4. Click on the picture , choose the tools menu, and click on Locked to make sure the picture doesn't accidentally get moved.

Here I have the bear highlighted. All the images I want hidden are below the bear in the list.


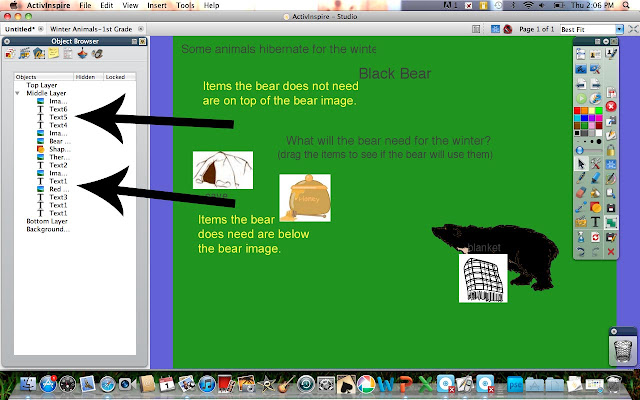
Now when I move the other items, they will go behind the bear.


You'll notice though, that the bear isn't big enough to completely hide the object. I could do three things. 1. Make the bear bigger, 2. make the other objects smaller, or 3. add a shape behind the bear to cover the objects.

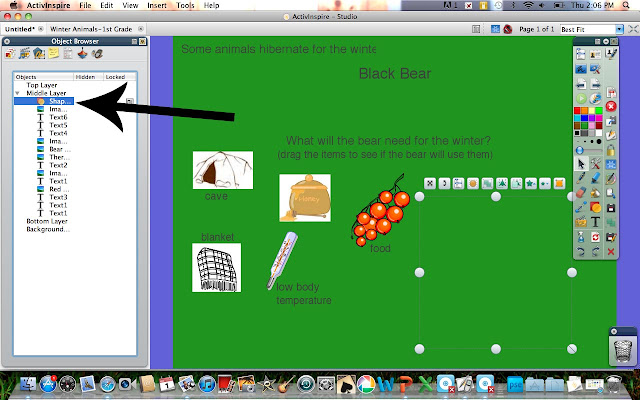
I don't want the items to be too tiny to see and I don't want a big black bear eating up the whole page. So I added a green square behind the bear. Here is how I did it.

1. Go to the shapes menu.
2. Choose the border color from the main toolbar. Choose a shape color from the shapes toolbar and choose a shape.
3. Draw the shape.


4. In the object browser, move the newly drawn shape just under the picture. (In my case, the bear.)


5. Choose the bear and the shape by pressing ctrl while clicking. Go to the tools menu and choose Group then Locked. This will make sure the shape and the bear don't move.


Now when I move the items, they will disappear behind the shape and be fully hidden.


Revealing Objects:
The same works in the opposite way. I can reveal objects that have been hidden. In this Jobs Sort flipchart students will pull sentences out of the envelope and put them with the correct job picture.

1. Write the sentences, words, or choose pictures.
2. Group them together. Layer them on top of each other. They will be hidden under the picture and will only come out one at a time. (Go ahead. It's ok. I promise.)


3. Place the shape, picture, or other object (in my case, the envelope) over the items to be revealed (in my case, the sentences.) If the item will not go on top, use the Object Browser to move the item to the top of the list. (In the picture above, you'll notice that the envelope is the first item in the list.)

4. Click on the item and chose the tools menu. Click Locked. This will make sure you don't move the item, just the objects hidden behind it.

5. To "reveal" the hidden objects, hover the mouse or Activpen over the item. When you see a smaller arrow and crosshairs, that means you have found a hidden object. Tap and drag to pull it out.


This is a super simple way to make an activity interactive. Students can take turns coming to the board and can even fix mistakes other students may have made. It also makes students think and use their knowledge to place the objects in the right places.

Friday, November 4, 2011

Creating A Drop Down Box in Excel

Just in case your screen looks slightly different, I have Excel 2011 for Mac.
I used information on Excel 2003 to remember how to do this though, so hopefully between the two you can find the right way to do it.

1. Create a new worksheet page. Type your list into the cell boxes. Select all the cell boxes that you want in your list and then name the list.


2. Go back to your first worksheet page (Sheet 1). Select the cell where you want your drop down box to appear.
3. Under Data, choose Validate.
4. Select Data Validation


5. Under Settings, choose the information to appear as List.


6. In the box labeled Source, type an = sign and then the name of your list. (Example: =Title)


7. Click Ok. Your cell should now have an arrow and when you click the arrow the drop down box with your list will appear.


For the 2003 information, go here.

Thursday, November 3, 2011

SuccessMaker: Editing Student Allowed Minutes

For those starting Success Maker, the program is currently set for each student session to be 20 minutes. You however, need the student sessions to be 15 minutes. Here is how to edit this:

1. Log In
2. Go to Users/Groups --> Students --> View/Browse then click on the student's name.


3. Under the student's options, choose Edit.
4. Next to Session Length choose 15 minutes and click Save.


You will need to do this for each subject, for each student. But once it's done, it's done and you won't have to change it again.

Hope this helps!

Wednesday, November 2, 2011

ActivInspire: Missing Toolbar Fix

If this is you: "AHHH!!! What happened to my toolbar? Why can't I move it? Where are my menu options??!!" (insert hair pulling out here) Then this might be what you are seeing: your main toolbox is off somewhere and you either can't find it or it is moved up too high and you can't do anything with it. Your menu options (File,Edit, etc...) are also missing.

It's not your fault. You didn't do anything wrong. Sometimes the computer and the board miscommunicate. Like maybe the computer didn't do the dishes, but the board wanted him to want to do the dishes. It happens.

This is what you need to do:

1. Take a deep breath.
2. Press Ctrl + J
3. Choose the Layout Tab
4. To get your Main Toolbar back: Next to Main Toolbox, click the arrow and choose Dock Top (really any option will do). Your toolbox will appear docked across the top of the screen. Then you can go back and choose Floating. That should appear they way it was meant to be.
5. To get your Top Menu back: Next to Menubar make sure it is labeled Dock Top and next to that click the box that says Visible.


Click Done and everything should be back to normal. (Insert sigh of relief here.)

Tuesday, November 1, 2011

Resources for Using and Creating Interactive Lessons

I wanted to take a minute to share some information and some links I've been visiting recently for help on creating and using interactive lessons.

In undergrad we were required to take a computer skills course specifically pertaining to the classroom. It has been a while, but one thing from the course that really stuck with me was creating an effective PowerPoint. This was a subject that I revisited during my graduate courses for instructional technology.

Some of the key points were:
1. Don't cloud up the screen with words. One or two sentences will do.
2. Pictures should draw the viewer to the information being presented and pertain to the information being presented on the screen. (For example, a football player should be running towards the words, not away from them.)


3. When presenting, don't just read the slide. The viewer is reading it themselves, elaborate and explain.

I think these points can be applied to creating charts for interactive whiteboards. Of course, you aren't just making a presentation for students with whiteboard software. Now you are adding a new level, interactivity. Something I always do when creating a flipchart to present information is to create it like I would a presentation, then go back and add interactive parts to each or most of the slides. I always want students to be able to interact with the screen in some way, big or small. (For example, after you elaborate and explain, have something the students can do to prove they understood what you just said. This reinforces the points you just made and reviews them for students who may not have understood.)


Just think of your whiteboard software as PowerPoint with super powers, out to improve lessons one interactive whiteboard at a time!

Also check out the Flipchart Fundamentals for more information about creating effective interactive lessons.

Flipchart Fundamentals: From Promethean Planet, but also useful information that can be applied to creating SMART notebooks as well.
Other useful resources:


Matt Barfield, Promethean Trainer who visited us in August:

ActivTips: For Promethean Users

Bellevue County Schools, Nebraska: These are resources by grade level that can be used on any computer, in the computer lab, or on your interactive whiteboards. They have got it going on! (Check out some of the awesome webquests)

SMART: Creating A Circle Map

Recently a kindergarten teacher asked me to make a circle map in a notebook for a lesson. She wanted two maps and pictures to put on each map so students could choose the main idea of the pictures. Here is how I made it:

1. Create circles by clicking on the shapes tool and then choosing the circle tool.


2. Draw the circles on the page. Click on the circle to move and resize.


3. Choose pictures by going to the images screen and typing in your keywords in the 
search box. Under the pictures option will be the pictures SMART notebook found. Double click the image or drag it to insert it on your page. 


4. You can click on the image to resize and relocate it on your screen. In my final product I also changed the background colors. When you are ready to use it, students can click and drag the pictures to the appropriate map and write the main idea on the inside circle. Simple, but fun!


For information on changing the background color, go here.


Thursday, October 27, 2011

Promethean: Creating Labels

To create pictures that reveal labels, there are just a few simple steps.

First, make sure you have your browser window open (view-->browsers)

1. Choose the picture. For this flipchart I chose acorns.
2. Click on the picture and then click Property Browsers


3. In the browser, the label options will appear.


The "caption" is what you want the label to say.
Then you can choose the font, size, color, and background color of the label.

4. Then choose behaviour-->tooltip. Now, when the flipchart is open and you move the pen or arrow over that picture, the label will appear.


In this flipchart I used labels as answers to questions. You could use this in a variety of ways and allow students to come up and interact with the board. What ways do you think you could use this in your classroom flipcharts?

Thursday, October 13, 2011

SMART: Free Resources for Learning

As you know I'm still learning how to use a SMART board and still getting familiar with the software. Luckily, SMART Tech has some free online resources to help me get on my way. I found this site off of the SMART Exchange:

http://www.smarttech.com/us/Resources/Training/Training+Search+Pre-filter

Here you can complete the Free Needs Assessment


When you do, the information you give will help the webpage powers that be know where you need to start in your learning process. Then it will offer up guides and free tutorials that will take you through some good information. I've gone through almost all of it and I feel more comfortable with the program now. The training leaves quite a bit to be desired, but the courses that seem to have the best info. all cost $. It's definitely worth taking the time to look at the free information though. Any little bit can help.

Happy Notebooking!

Promethean: ActivTips

If you still feel uneasy with your Promethean Board, or with ActivInspire, you really need to take the free online courses Promethean Planet offers. These are self paced tutorials that teach you the basics. For information on how to take these courses and learn all the awesome new stuff, go here.

If you feel more comfortable with the software, any time you want to know how to do something new in ActivInspire, go here:

http://www.prometheanplanet.com/en/professional-development/activtips/


They actually have taken the time to make video tutorials of step by step instructions on so many different things you might want to do. I've used them recently to remember how to make containers and try to make a magic revealer. As with anything, these all take practice. But it sure does help to have someone to take you through it step by step. Don't forget you can always pause and practice before moving on.

Happy Flipcharting!

Thursday, October 6, 2011

SMART: Backgrounds

When you open up SMART Notebook, all you get is a blank white page. How about putting some pizazz on that screen to spruce up your notebook? Today I'll tell you how to set new backgrounds to your pages.

First, go to Format--> Background or Right Click-->Set Background.


A toolbar will come up on the side and give you four options. You can choose a solid color, gradient, pattern, or upload your own picture from the files on your computer.


All are excellent options depending on what your topic is. Solid fill is great to liven up the background of basic interactive activities, as is the gradient fill. The pattern fill really isn't my favorite, but I can see it's value for basic black and white backgrounds if it fits your theme. The image fill is great for science and social studies themes, or even when making activities to go with books the kids are reading in class. Remember you can always add pictures over a colored or gradient background so the picture doesn't take up the whole slide. So now you can spruce up those interactive activities. Don't forget to look for images and other resources on the SMART Exchange!