Hiding Objects:
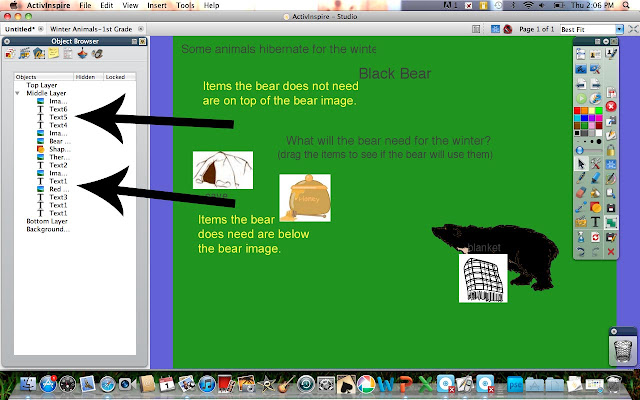
I made a flipchart where I wanted the students to sort pictures into what a bear would need for hibernation and what he wouldn't. I found some pictures of items a bear would and would not need, and then a picture of a bear.
1. Place the pictures in the flipchart.
3. Place the images and/or text you want to "hide" under the main image in the list. Place the images and/or text you do not want to "hide" above the main image in the list.
4. Click on the picture , choose the tools menu, and click on Locked to make sure the picture doesn't accidentally get moved.
Here I have the bear highlighted. All the images I want hidden are below the bear in the list.

Now when I move the other items, they will go behind the bear.
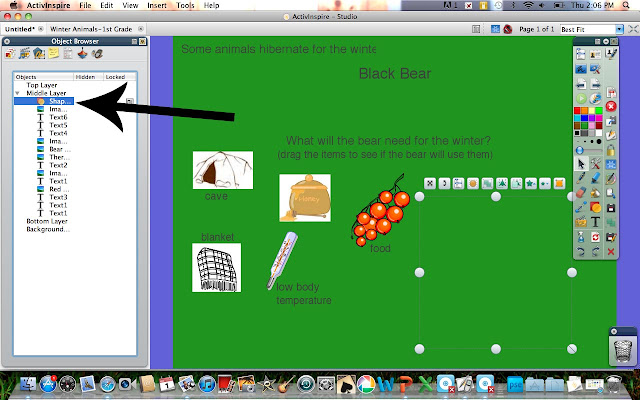
You'll notice though, that the bear isn't big enough to completely hide the object. I could do three things. 1. Make the bear bigger, 2. make the other objects smaller, or 3. add a shape behind the bear to cover the objects.
I don't want the items to be too tiny to see and I don't want a big black bear eating up the whole page. So I added a green square behind the bear. Here is how I did it.
1. Go to the shapes menu.
2. Choose the border color from the main toolbar. Choose a shape color from the shapes toolbar and choose a shape.
3. Draw the shape.
4. In the object browser, move the newly drawn shape just under the picture. (In my case, the bear.)

5. Choose the bear and the shape by pressing ctrl while clicking. Go to the tools menu and choose Group then Locked. This will make sure the shape and the bear don't move.
Now when I move the items, they will disappear behind the shape and be fully hidden.
Revealing Objects:
The same works in the opposite way. I can reveal objects that have been hidden. In this Jobs Sort flipchart students will pull sentences out of the envelope and put them with the correct job picture.
1. Write the sentences, words, or choose pictures.
2. Group them together. Layer them on top of each other. They will be hidden under the picture and will only come out one at a time. (Go ahead. It's ok. I promise.)
3. Place the shape, picture, or other object (in my case, the envelope) over the items to be revealed (in my case, the sentences.) If the item will not go on top, use the Object Browser to move the item to the top of the list. (In the picture above, you'll notice that the envelope is the first item in the list.)
4. Click on the item and chose the tools menu. Click Locked. This will make sure you don't move the item, just the objects hidden behind it.
5. To "reveal" the hidden objects, hover the mouse or Activpen over the item. When you see a smaller arrow and crosshairs, that means you have found a hidden object. Tap and drag to pull it out.
This is a super simple way to make an activity interactive. Students can take turns coming to the board and can even fix mistakes other students may have made. It also makes students think and use their knowledge to place the objects in the right places.


No comments:
Post a Comment